salbu

How to Change Your Oil

Follow these simple steps and you’ll do the job right and for much cheaper.

The idea of performing maintenance, even a relatively simple task such as an oil change, may seem daunting, if not downright impossible. However, changing your own oil can be more convenient and less expensive than taking your vehicle to a local express lube shop. We’ll show you how to do it correctly, safely, and affordably in the following short video clips. You might even find working on your car is fun — much as we do.

If you’re unsure what kind of oil you should use or how often you should change it, refer to the technical specifications or service section of your owner’s manual. In this six-step video guide, we will walk you through a standard oil change—in this case on an Acura TSX, but the process is virtually identical whether you drive a Hyundai, Hummer, or anything else.

Before you even start this process, consult your owner’s manual (or the trusty internet) to determine exactly how much oil you will need to replace what you drain. And you’ll also need an oil filter. So you’ll be making a trip to an auto-parts store or a big-box retail outlet to get what you need. While you’re there, you’ll want to pick up an oil-filter wrench and the proper size wrench for your oil drain plug if you don’t already have those. And you’ll want some gloves to keep your hands clean; old-fashioned latex medical gloves work fine. Now you’re ready to go. Follow these steps to change your own oil:

Step 1: Jack It Up, Open It Up

First, you’ll want to lift the car high enough to give yourself room to work under it. Whether you use a hoist, ramps, or jack stands, make sure you are being absolutely safe. Never work under a car that is held up only by a floor jack. We raised our subject vehicle on the lift in the Car and Driver test garage, so you could see what we were doing. Most modern cars are fitted with a plastic under tray to both improve aerodynamics and protect vital components on the underside of the engine. In order to access the oil pan and oil filter on the TSX, the cover needs to be removed; most under trays are held on with a mixture of bolts, screws, or plastic clips that can be unfastened with basic hand tools. Before step two, be sure to examine the area for oil leaks. If any are found, consider having your vehicle inspected by a mechanic.

Step 2: Unplug It, Drain It

Situate your oil receptacle—five-gallon bucket, oil drain pan (available at an auto-parts store), oil reservoir, or any other sizable liquid-holding container—in such a way that the oil will drain into it without getting all over the ground or otherwise making a mess. Remember, there will be a lot of oil: Most cars have at least a gallon in their crankcase, and some a lot more. Remove the drain plug by loosening it (counterclockwise) with the proper wrench and unscrewing it. Hold on to the drain plug as you remove it; the oil will start pouring out as you pull it away from the oil pan. Allow the engine to drain for five minutes or until the flow of oil has slowed to a trickle.

Step 3: Off With the Old Filter

Find the oil filter. It’s the softball-sized cylindrical component screwed onto the engine (though some engines have a housing that you slip a filter cartridge into). Using your hand or an oil-filter wrench (you’ll likely need the latter), loosen the oil filter (turn counterclockwise) enough that the oil starts to come out of the top and drip down into your receptacle. Wait until the flow subsides and finish removing the filter. Before installing your new filter, be sure to verify that the old oil-filter gasket—a thin rubber O-ring—wasn’t left behind. This is particularly important; if the old gasket is not removed, the new filter won’t seal properly, which typically ends with all of your new, fresh oil leaking onto the ground within minutes of startup, potentially starving the engine of oil and leading to catastrophe. It is good practice to wipe down any oil-covered surfaces before you replace the drain plug and oil filter.

Step 4: Drain Plug in, Filter On

Replace the drain plug and tighten it until it’s snug, but not too much: Overtightening can cause damage to the oil pan and drain plug. Put some effort into tightening it, but not all of your strength. Some manufacturers have a torque spec that you can follow, using a torque wrench. In any case, do not try to rip off the head of the drain plug. Certain vehicles use a washer behind the drain plug that must be replaced when you reinstall the plug (check your owner’s manual to see if this washer needs to be replaced). Next, take your new oil filter and apply a light coating of oil (from a dab on the end of your finger) all around the rubber gasket on the top of the filter. This will help create a proper seal as you tighten the filter. The same rule applies when installing the filter: Don’t screw too hard, but rather turn it until it’s “hand tight” and then just a bit more, so it’s snug.

Step 5: Fill It Back Up with Oil

Once you have replaced the oil filter and drain plug, reinstall your undertray and lower the car back to the ground. Open the hood and remove the oil cap, which should have an oil-can symbol on it. Using a funnel, fill the engine with the manufacturer’s indicated volume of oil.

Step 6: Check the Oil Level, Check for Leaks

Finally, after waiting a few minutes for the oil to settle into the pan, use the dipstick to verify that your oil is at the proper level. Checking your oil is simple: Pull the dipstick from its tube, wipe away all oil with a paper towel, reinsert the dipstick, remove the dipstick, and confirm that the oil is lined up with the full marking on the tip of the dipstick. Finally, start the vehicle and let it idle and warm up; check for leaks under the vehicle and around the oil filter.

Congratulations! You’ve changed your oil and saved a bunch of money. Now, doesn’t that feel great?

How to Change a Flat Tire

MAINTAINING YOUR VEHICLE

Knowing how to change a tire is a necessary skill for all drivers. If you rely on a cell phone to save you in a roadside emergency, there’s always that chance you will forget to charge it, be out of range, or leave it at home. Flat tires can happen anywhere, and a cell phone is no substitute for knowing how to change a flat tire.

Thankfully, changing a tire isn’t all that hard! Just adhere to the following guidelines to be prepared in case you have a flat.

ITEMS YOU’LL NEED TO FIX A FLAT TIRE

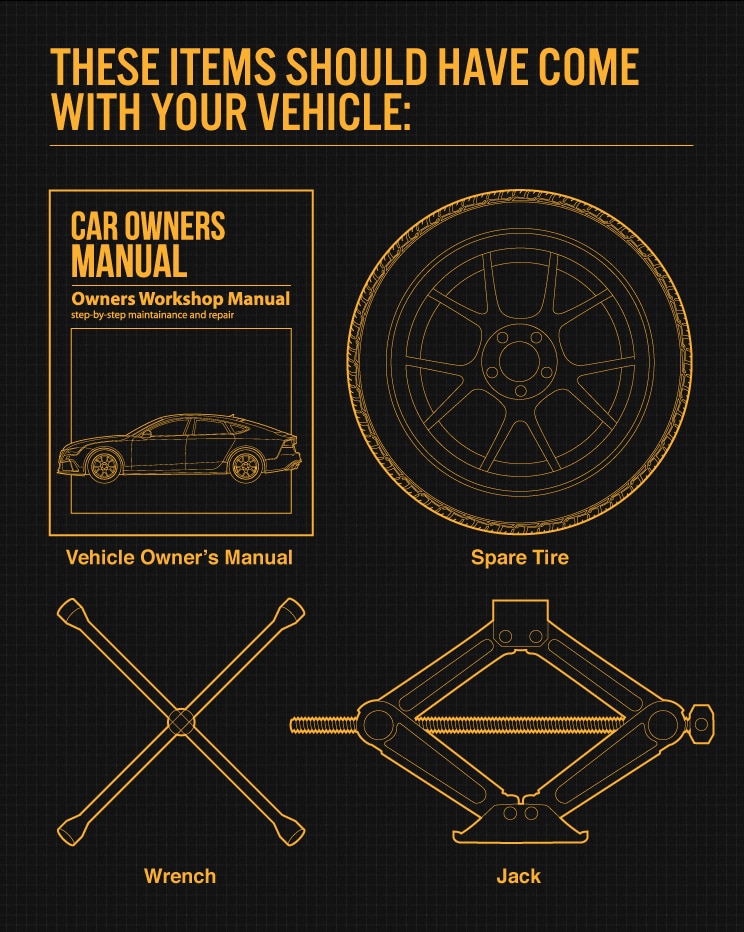
These items should have come with your vehicle:

Jack

Lug wrench

Fully inflated spare tire

Vehicle owner’s manual

If you have misplaced any of these items, or if your car did not come with these items, you should purchase new ones right away. And be sure you’re regularly inflating the spare tire to your vehicle manufacturer’s recommended PSI. You should check the spare’s air pressure every time you check your other tires. Remember to check pressure every month and before long trips or carrying extra load.

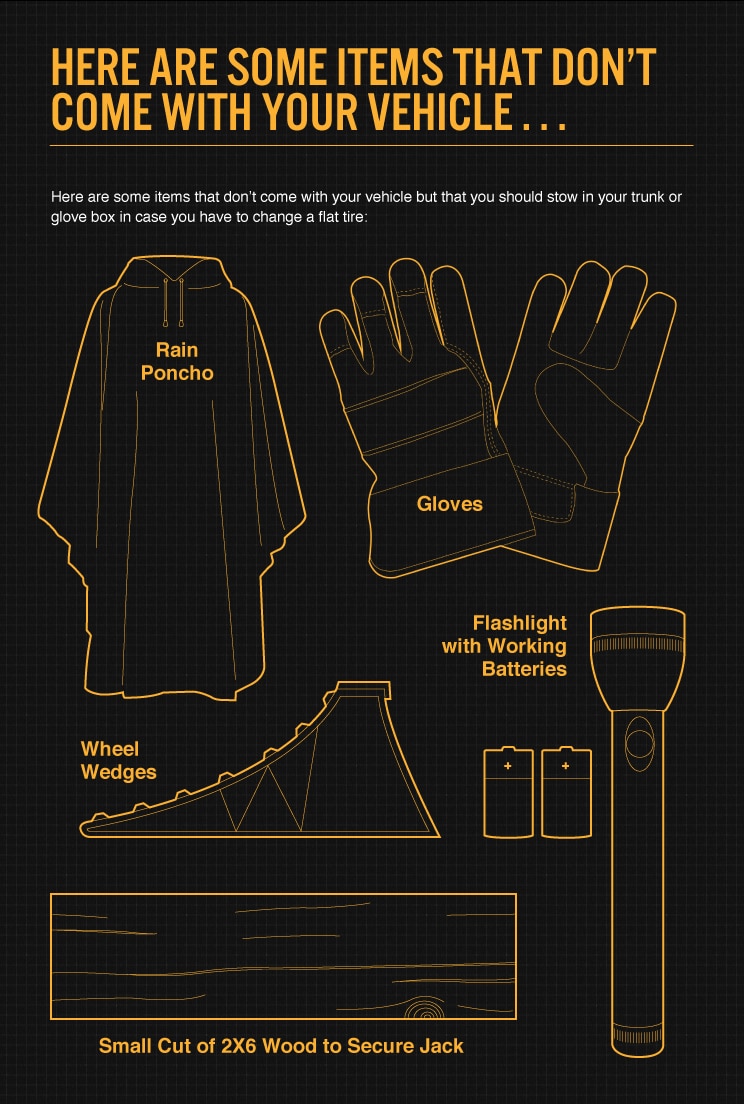
Here are some items that don’t come with your vehicle but that you should stow in your trunk or glove box in case you have to change a flat tire:

Flashlight with working batteries

Rain poncho and Small cut of 2″x6” wood to secure the jack

Gloves

Wheel wedges

HOW TO CHANGE TIRES

1. FIND A SAFE LOCATION

As soon as you realize you have a flat tire, do not abruptly brake or turn.  Slowly reduce speed and scan your surroundings for a level, straight stretch of road with a wide shoulder. An empty parking lot would be an ideal place. Level ground is good because it will prevent your vehicle from rolling. Also, straight stretches of road are better than curves because oncoming traffic is more likely to see you.

Never attempt to change your tire on a narrow shoulder near oncoming traffic. Keep moving (slowly) until you find a safer spot. While driving on a flat risks ruining your rim, replacing a rim is better than being hit by an inattentive driver.

Make sure to consult your owner’s manual and review their specific steps on how to change a flat tire for your vehicle

2. TURN ON YOUR HAZARD LIGHTS

Your hazard lights or “flashers” will help other drivers see you on the side of the road. To avoid an accident, turn them on as soon as you realize you need to pull over.

3. APPLY THE PARKING BRAKE

Once stopped, always use the parking brake when preparing to replace a flat tire. This will minimize the possibility of your vehicle rolling.

4. APPLY WHEEL WEDGES

Wheel wedges go in front of or behind the tires to further ensure the vehicle doesn’t roll while you fix the flat tire. If you’re changing a rear tire, place these in front of the front tires. If your flat tire is at the front, put the wheel wedges behind the rear tires.

Bricks or large stones will work just as well as “real” wheel wedges. Just be sure they’re large enough to stop the car from rolling.

5. REMOVE THE HUBCAP OR WHEEL COVER

If your vehicle has a hubcap covering the lug nuts, it’s easier to remove the hubcap before lifting the vehicle with the jack. If your lug nuts are exposed, you can skip ahead to Step 6.

Use the flat end of your lug wrench to remove the hubcap. This will work for most vehicles, but some hubcaps need a different tool to come off. Consult your owner’s manual for proper hubcap or wheel cover removal procedures.

6. LOOSEN THE LUG NUTS

Using the lug wrench, turn the lug nuts counterclockwise until you break their resistance. You may have to use force, and that’s ok. Use your foot or all of your body weight if necessary.

Loosen the lug nuts about ¼ to ½ of a turn, but don’t remove them completely yet. Save that for when it’s time to remove your tire/wheel from the vehicle.

7. PLACE THE JACK UNDER THE VEHICLE

The right place for the jack is usually beneath the vehicle frame alongside the tire that’s flat. Many vehicle frames have molded plastic on the bottom with a cleared area of exposed metal specifically for the jack. To safely lift and avoid damage to the vehicle, follow the instructions for jack placement in your vehicle owner’s manual.

8. RAISE THE VEHICLE WITH THE JACK

To prevent the jack from settling under the weight of your vehicle and coming off balance, place a small cut of 2×6” wood beneath it before attempting to raise your vehicle. This tactic is especially helpful on asphalt.

With the jack properly positioned, raise the vehicle until the flat tire is about six inches above the ground.

Never put any part of your body under the vehicle during or after raising the vehicle with the jack.

9. UNSCREW THE LUG NUTS

Now it’s time to remove the lug nuts all the way. Since you’ve already loosened them, you should be able to unscrew them mostly by hand.

10. REMOVE THE FLAT TIRE

Gripping the tire by the treads, pull it gently toward you until it’s completely free from the hub behind it. Set it on its side so that it doesn’t roll away.

11. MOUNT THE SPARE TIRE ON THE LUG BOLTS

Now place the spare on the hub by lining up the rim with the lug bolts. Push gently until the lug bolts show through the rim.

12. TIGHTEN THE LUG NUTS BY HAND

Put the lug nuts back on the lug bolts and tighten them all the way by hand. Once they are all on, check each one again, tightening as much as possible.  You will tighten them with the wrench after lowering the vehicle to the ground.

13. LOWER THE VEHICLE AND TIGHTEN THE LUG NUTS AGAIN

Use the jack to lower the vehicle so that the spare tire is resting on the ground but the full weight of the vehicle isn’t fully on the tire. At this point, you should tighten the lug nuts with the wrench, turning clockwise, as much as you can.  Push down on the lug wrench with the full weight of your body.

14. LOWER THE VEHICLE COMPLETELY

Bring the vehicle all the way to the ground and remove the jack. Give the lug nuts another pull with the wrench to ensure they’re as tight as possible.

15. REPLACE THE HUBCAP

If the hubcap you took from the flat tire will fit your spare, put it in place the same way you removed it initially. If it doesn’t fit, stow it away with the tire when you stow your equipment.

16. STOW ALL EQUIPMENT

You have before you a jack, a lug wrench, wheel wedges, your flat tire, and possibly a hubcap. Don’t forget to put all of them in your vehicle before driving away.

17. CHECK THE PRESSURE IN THE SPARE TIRE 

You should check the tire pressure of the spare tire to make sure that it is safe to drive on. “T-Type” temporary spares, also called “mini-spares,” require 60 psi (420 kPa).  If the tire needs pressure, drive (slowly) to a service station immediately.

18. TAKE YOUR FLAT TIRE TO A TECHNICIAN

Temporary spare tires aren’t made to drive long distances or at high speeds, so drive cautiously until you’re able to visit a tire technician. A professional should be able to determine whether your tire needs a repair or if it’s time to replace it.

HOW LONG DOES IT TAKE TO FIX A FLAT TIRE?

Aside from taking your tire to a professional, the above procedure shouldn’t take more than 15 to 30 minutes to change a tire. Just be sure you don’t leave out any steps.

It’s beneficial practice changing a tire in your garage or driveway to ensure you’re ready to handle this situation if it ever happens to you.

A FEW MORE TIPS ON CHANGING TIRES

Knowing how to fix a flat tire is great, but regular tire maintenance is even more important. In addition to reviewing this guide regularly, remember to do the following:

Keep your tires properly inflated

Rotate your tires according to the manufacturer’s guidelines

Monitor for tread wear

All of these precautions will extend the life of your tires and reduce the likelihood of a flat. While there’s no way to prevent flat tires completely, proper care can improve performance and ensure your tires last as long as possible.

CONTINUE YOUR JOURNEY

There’s never a good time for a flat. That’s why Bridgestone DriveGuard tires are masterfully engineered to keep you moving for up to 50 miles at speeds up to 50 MPH without disruption.

CONTINUE YOUR JOURNEY